

Patio Pavers in Concrete: How to Install Them over a Slab
You can install patio pavers in concrete patios, or more precisely over them, when the slab is solid, drains away from the house and sits low enough to take about 3½ inches of new surface. The method is straightforward. Repair the slab, plan the height and drainage, fix a firm edge, screed a 1-inch bed of bedding sand, lay the pavers, then cut, compact and lock the joints with polymeric sand.
The problem is that a stained, cracked or dated slab feels like a sentence to demolition. Breaking it out, hauling it away and building a gravel base adds days and money. Yet many overlays fail for avoidable reasons. Pavers rock on coarse gravel, water gets trapped under the surface, or the finished patio ends up level with the door threshold.
This guide walks through the full job in four steps, with a materials table, a worked example for a 12 by 15 foot patio and the checks that decide whether an overlay is worth doing. JR's Lawn Maintenance installs paver patios across Henderson, Las Vegas and Summerlin, so the notes also cover desert conditions such as heat and sudden summer downpours.
Before you start: when an overlay works
Can you put pavers on a concrete patio?
Yes. Pavers on a concrete patio are a proven repair when the slab is structurally sound. The slab acts as a flat, rigid base, so you skip demolition, excavation and the compacted gravel layer that a ground-level paver patio needs. That is where most of the savings come from. Final prices still depend on paver choice, patio size and layout, so a written on-site estimate beats any rule of thumb.
The overlay brings two real trade-offs. Height goes up by the paver thickness plus the sand bed, and drainage gets harder because water cannot soak through the slab. Both are manageable if you plan for them in Step 2. Both are also the reasons overlays go wrong when people ignore them.
An overlay works when the slab is sound, the slope is right and the door still clears.
Three ways to set pavers over a slab
Sand set is the right method for most home patios. It is one of three overlay methods, and the table shows how they differ.
| Method | How it holds | Best use | Watch out for |
|---|---|---|---|
| Sand set | 1-inch bed of bedding sand with a firm edge restraint | Residential patios and walkways | Needs weep holes so water can leave the sand |
| Bituminous set | Bedding sand mixed with a bituminous binder | Mostly commercial and vehicular jobs | Specialty product, not a typical DIY patio method |
| Mortar set | About ¾ inch of latex-modified mortar, with mortar joints | Non-vehicular areas, steps, small landings | Rigid, so slab cracks can telegraph through, and it is hard to undo |
A sand-set overlay tolerates small slab movement and lets you lift and replace a single paver later. A mortar bond is permanent and leaves no path for water to escape. That is why this guide follows the sand-set method and uses adhesive or mortar only at the perimeter.
Materials and quantities for a 12 by 15 patio
A 12 by 15 foot patio covers 180 square feet and has a 54-foot perimeter. The table shows what to buy for that size. Scale the numbers to your own slab.
| Item | Job | Quantity for the example |
|---|---|---|
| Concrete pavers | Finished surface | 200 sq ft (180 plus about 10% for cuts and breakage) |
| Bedding sand | 1-inch leveling bed | About 15 cubic feet, or 30 half-cubic-foot bags, plus a few spare |
| Edge restraint or perimeter pavers | Holds the field in place | 54 linear feet |
| Masonry screws or paver adhesive | Fixes the edge to the slab | Per product label |
| Polymeric sand | Locks the joints | Check the bag for coverage at your joint width |
| Two 1-inch pipes and a straight 2x4 | Screed rails and board | One set |
| Concrete crack filler and repair mortar | Slab repairs | Per slab condition |
You also need a 4-foot level, string line, tape, hammer drill with a masonry bit, rubber mallet, plate compactor with a pad, wet saw with a diamond blade, push broom and leaf blower. Add safety glasses, hearing protection and a dust mask. Order 15% extra pavers if you plan a diagonal or herringbone pattern, because it creates more cuts.
Step 1. Inspect and repair the slab
Test the slab before you buy anything
Walk the whole slab and look for movement, because a slab that moves will move your pavers . Rock your weight on corners and edges, tap the surface with a hammer and listen for hollow spots, and lay a 4-foot level across every crack to measure height differences. Then use this table to decide.
| What you find | Verdict | What to do |
|---|---|---|
| Hairline cracks, no height difference | Fine | Clean out and fill with crack filler |
| Cracks wider than ¼ inch, both sides level | Fine | Fill with patch or sealant so sand cannot wash down |
| One side higher or lower by about ½ inch | Fixable | Grind the high side or patch the low side |
| Slab rocks, sounds hollow, or has sunk or heaved | Not a candidate | Fix the base or replace the slab |
| Deep flaking or crumbling surface | Usually not a candidate | Replace if loose material keeps coming up |
| Slopes toward the house | Not a candidate yet | Correct the grade first, ideally with a pro |
In parts of the Las Vegas valley, slabs crack because the soil beneath them swells and settles. A crack alone is not a deal-breaker. What matters is whether it is stable and level across both sides . A crack that has held the same width and height for years is a fine base. One that keeps growing tells you the ground is still moving.
If the slab rocks, sinks or heaves, pavers will only hide the problem for a season.
Clean, patch and prepare the surface
A clean, level slab gives the sand bed a predictable base. Work through the prep in this order.
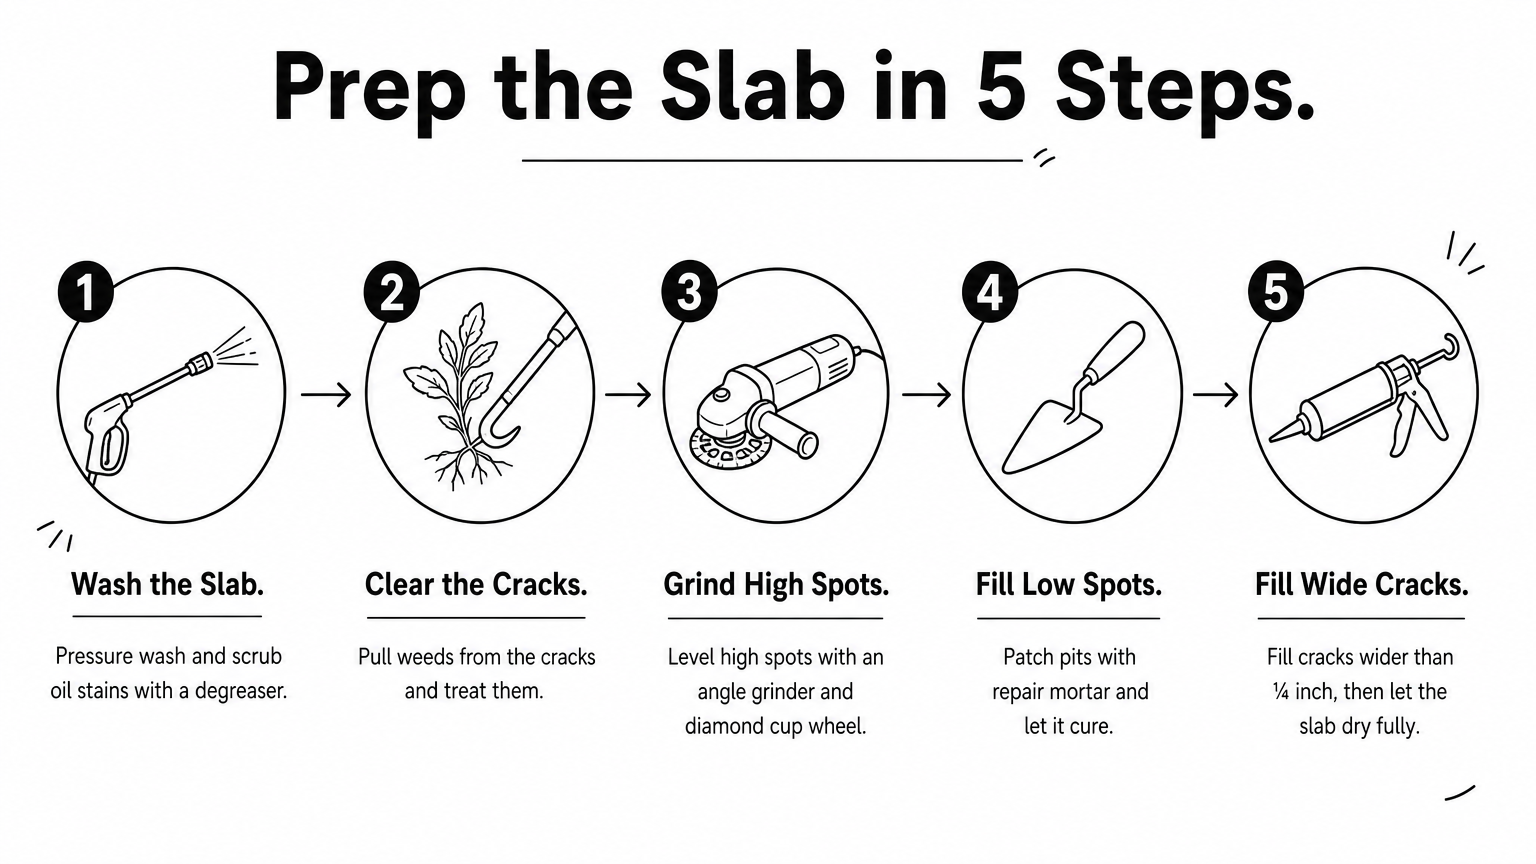
- Pressure wash the slab and scrub oil stains with a degreaser.
- Pull weeds from the cracks and treat them so they do not push up through the joints later.
- Grind down high spots with an angle grinder and a diamond cup wheel.
- Fill pits and low spots with repair mortar and let it cure as the label says.
- Fill cracks wider than ¼ inch, then let the slab dry fully.
Do not try to fix big problems with extra sand. A uniform 1-inch bed is what keeps pavers stable. Sand piled 2 or 3 inches deep in low areas compresses unevenly and leaves sunken patches within a season.
Step 2. Set the height, drainage and edging
Work out the finished height at your door
Add the paver thickness to the sand bed, then compare the total with the gap between your slab and the door threshold. The standard rise looks like this.
| Paver | Sand bed | Total rise |
|---|---|---|
| 2⅜ inch (60 mm) standard | 1 inch | About 3⅜ inches |
| 1½ inch thin | 1 inch | 2½ inches |
Measure from the slab to the underside of the door threshold. Keep the finished surface at least 1 inch below the threshold , so rain and hose water run away from the door. With standard pavers, that means the slab should sit about 4½ inches below the threshold. If it does not, use thinner pavers, but follow the manufacturer's instructions for slab installs because many thin pavers require a mortar bond. Otherwise skip the overlay.
The slab edge also grows taller by the same amount. Check steps down to the yard , gates, planters and walls before you commit. If you live in a planned community such as Summerlin, Anthem or Inspirada, ask your HOA and your local building department whether the change needs approval before you order materials.
Measure the height at the door before you buy a single paver.
Plan drainage and slope
A sand-set overlay needs two exits for water: slope on the surface and weep holes through the slab. Check the slope with a level and a short block. A drop of ⅛ to ¼ inch per foot away from the house is the target. Then run a hose on the slab for several minutes and mark every spot where water pools.
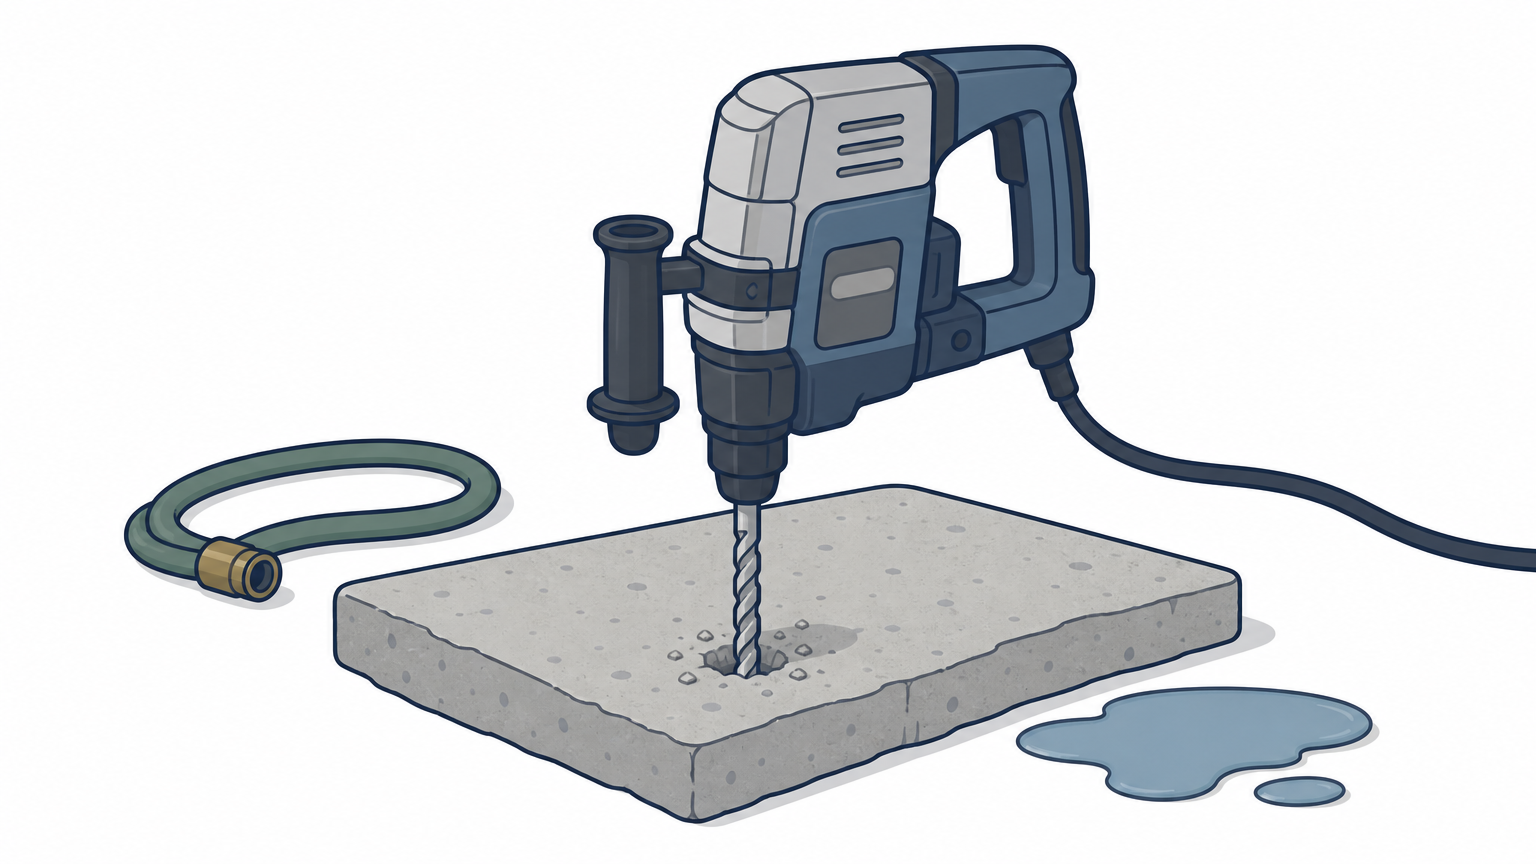
At each low spot, drill a ½-inch weep hole through the slab with a hammer drill and masonry bit. Rain, irrigation overspray and hose-downs will all push water into the joints, and without an exit that water sits in the bed and loosens it. Summer storms in Southern Nevada can drop a lot of water in minutes, so do not skip this.
Lock the perimeter in place
Sand-set pavers need an edge restraint, and you cannot drive spikes into concrete. You have three practical options.
- Fasten rigid or flexible paver edging to the slab with masonry screws.
- Bond a perimeter row of pavers to the slab with paver adhesive or a bed of mortar. This is the best choice where the slab edge meets the house or a wall.
- Spike plastic edging into soil or turf where the slab edge has bare ground beside it, as long as the edging sits flush against the pavers.
Before you fix anything, dry-lay a row from the door, snap a centerline and plan your pattern so edge pieces end up at least a third of a paver wide. JR's Lawn Maintenance installs from the customer's own layout and does not offer design services, so settle the pattern first if you plan to hire the work.
Step 3. Screed the sand bed and lay the pavers
Screed a 1-inch bed of bedding sand
Use fine bedding sand, such as concrete sand or leveling sand, and never crushed paver base rock. Coarse base rock is made for ground installs. Over a slab it leaves high points under the pavers, and a wobbly paver stays wobbly . Fine sand gives pavers a firm, even seat.
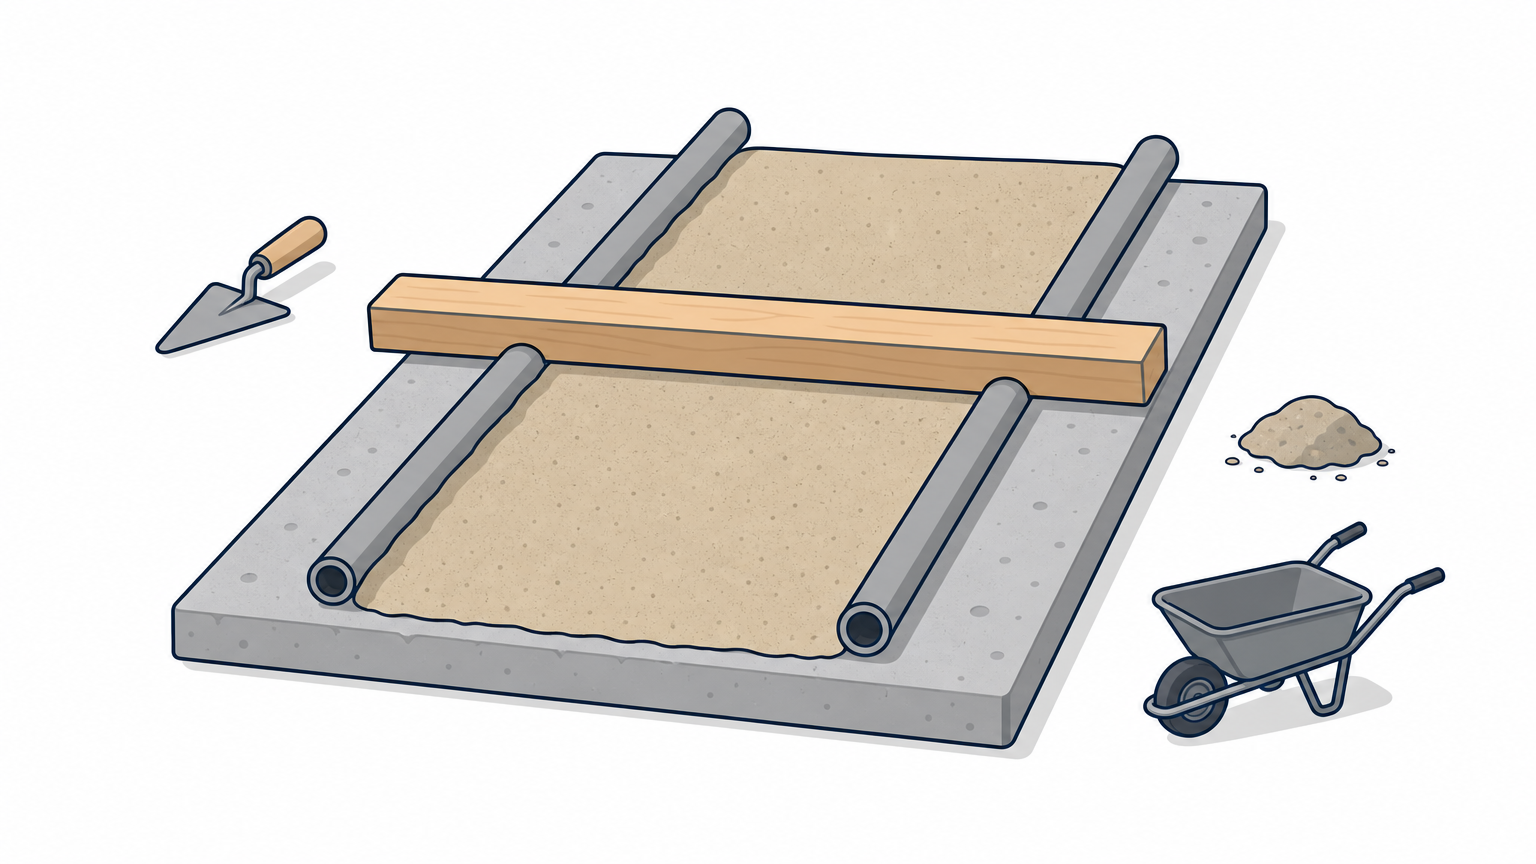
- Lay strips of landscape fabric over cracks and weep holes so sand cannot wash down. This step is optional.
- Set two parallel screed rails, the 1-inch pipes, on the slab, spaced so your straight 2x4 rides on both.
- Fill between the rails with sand and pull the board across in a gentle sawing motion.
- Lift the rails, fill the grooves with sand and smooth them with a trowel.
- Screed only the area you will pave that day, and never step on it.
Because the rails rest on the slab, the bed stays a uniform 1 inch and the finished surface keeps the slab's slope. Do not compact the sand at this stage.
Fine bedding sand, screeded flat and never walked on, is what keeps pavers from rocking.
Lay the pavers from a square starting line
Start in a corner against a straight reference, such as the house wall, and set the first row tight against the edge restraint. Check that it is square, because every row that follows inherits its error. Place each paver straight down onto the sand. Sliding a paver pushes the bed out of shape and leaves a hollow.
Use the spacer lugs or plastic spacers to hold joints at about ⅛ inch. Run a string line every three or four rows to catch drift, and seat each paver with a rubber mallet . Check with a level across several pavers as you go. Kneel on a plywood board over laid pavers so your weight spreads out and you do not disturb the sand.
Pull pavers from several pallets at once so slight color differences blend. In summer, work in the morning , because pavers left in full sun get uncomfortably hot to handle and the sand dries out fast.
Step 4. Cut, compact and lock the joints
Cut edge pavers safely
Measure each edge piece, mark it and cut it with a wet saw and a diamond blade. A rented masonry saw is the cleanest tool for the job, and an angle grinder with a diamond blade handles small and curved cuts. Concrete dust contains silica, so wear a dust mask , safety glasses and hearing protection, and keep the blade wet if you can.
Avoid slivers narrower than about a third of a paver. If your last cut would be too small, trim the row before it so both edge pieces end up wider. Fix the cut pieces to the perimeter with adhesive if the edge detail calls for it, then check the whole field with a level once more.
Compact and fill with polymeric sand
Compaction seats the pavers and prepares the joints. Sweep dry polymeric sand across the surface until the joints are full, then run a plate compactor with a urethane pad over the whole patio. Sweep in more sand, compact again, and top off any joints that dropped. For thin pavers, tap with a mallet instead of using a compactor, because a plate can crack them.
Then blow every grain off the paver surfaces , because leftover polymer hardens into a haze. Mist the patio lightly as the bag directs, and keep foot traffic off for the time on the label. Most polymeric sands need a dry surface and no rain for about 24 hours, so check the forecast. Summer thunderstorms can wash a fresh joint out.
Polymeric sand only works when the joints are full and the surface is swept clean before you add water.
Seal or leave natural
Sealer is optional. It deepens color and helps resist oil and fertilizer stains, while unsealed pavers weather and soften over time. If you seal, wait for the cure time on both the polymeric sand and the sealer labels. Afterward, sweep and hose the patio as needed, and top up the joint sand if it settles low.
Start with the slab, finish with the joints
Laying patio pavers on an existing slab comes down to a short chain of decisions. Confirm the slab is stable, confirm the finished height clears the door, give water a way out, hold the edge, and set the pavers on a flat 1-inch bed of fine sand. Cut carefully, compact, and lock the joints with polymeric sand.
If the slab fails the Step 1 checks, or the height and drainage math does not work, a different base is the better path. For homeowners in Southern Nevada who want a licensed crew to assess the slab and handle the install, JR's Lawn Maintenance offers a free on-site estimate for a paver patio. Bring your layout, and we will tell you what your slab can take.